
How to Use QR Codes with Event Platforms via QR TIGER and Zapier
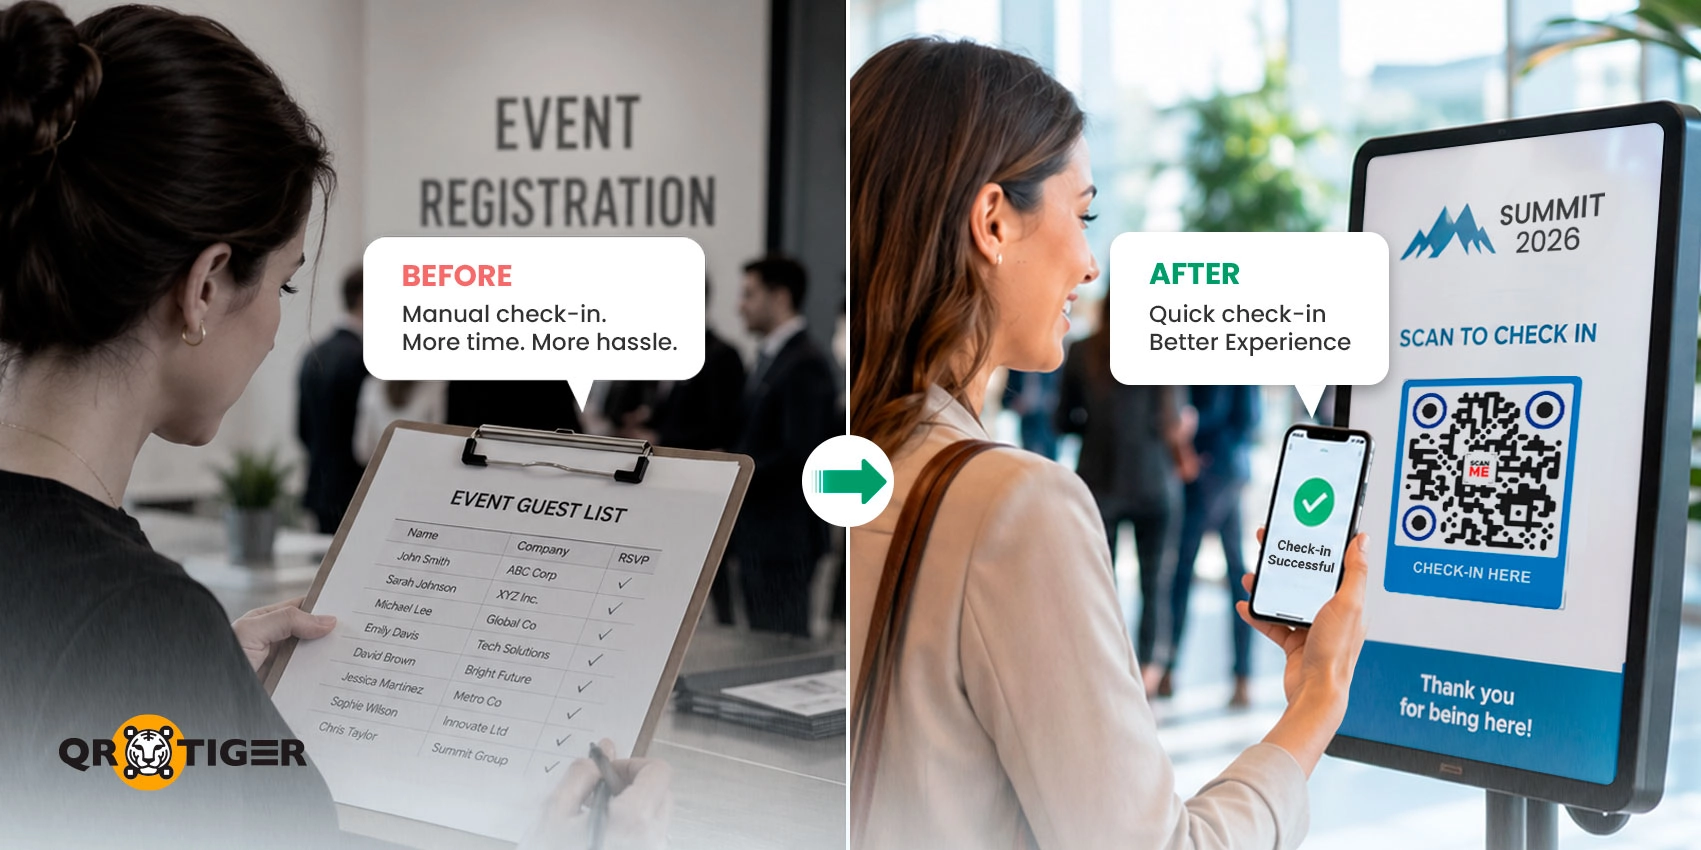
Connect QR TIGER to your event platform via Zapier with two flows: one that generates personalized attendee QR codes upon registration, and one that captures attendance data from each scan.
According to survey data, 32% of consumers identify events as one of the top places they scan QR codes, while 24% use QR codes for ticketing. The habit is already there. Setting up an automation makes your event tasks become faster, more accurate, and easier to manage.
This guide walks you through both flows step by step using QR TIGER's Zapier QR code generator integration.
Table of Contents
- What you need to know
- How to automate event check-ins and ticketing using QR TIGER and Zapier
- What you need before you build the automation
- Pre-event: How to generate personalized QR code tickets from your event platform
- Event-day: How to attach the attendee identity to every scan
- What data can I get from QR code scans?
- What are the post-event actions I can trigger after each scan?
- How much time does QR code automation save event organizers?
- Common questions from event teams
- Automate your event check-ins with QR TIGER and Zapier
- Terms and definitions
What you need to know
- QR TIGER connects to event platforms through Zapier in two directions.
- The pre-event flow generates personalized ticket QR codes on registration.
- The event-day flow matches each QR code scan with the attendee's information. This gives you a complete record of who checked in.
- Zapier access requires an Advanced or Premium plan on the QR code generator.
- Each scan passes timestamp, device, and location data to your reporting stack.
- Zapier can’t push check-in status back to your event platform; instead, the scan data flows to your reporting stack.
How to automate event check-ins and ticketing using QR TIGER and Zapier
There are two Zapier workflows you can use to automate QR code event check-ins.
Pre-event: Your event platform notices a new registration and fires the trigger. QR TIGER creates a personalized QR code as the action. The QR code lands in the guest’s inbox as a branded ticket.
Event-day: A guest scans the QR code at the entrance. QR TIGER fires the trigger. Zapier pairs the scan with your event platform’s attendee data.
Note: Eventbrite's Zapier integration doesn't have a direct action to check in attendees. This is common with many event platforms. Instead, event organizers use the "Find Attendee" action to get a person's registration details after they scan a QR code. They can then automatically send that information to their reporting tools.
What you need before you build the automation
To build the automation, you need:
- A QR TIGER account on an Advanced or Premium plan for API key and Zapier access;
- Your event platform account connected to Zapier (Eventbrite, Cvent, or comparable); and
- A Zapier account (free tier fits small event volumes; paid tiers cover multi-Zap setups).
The walkthrough sections use Eventbrite as the concrete example, since it's the most common event tool with an official Zapier integration.
Event check-in software like Cvent and Whova follow the same pattern with different field names. Check your platform's Zapier app page for platform-specific labels.
Pre-event: How to generate personalized QR code tickets from your event platform
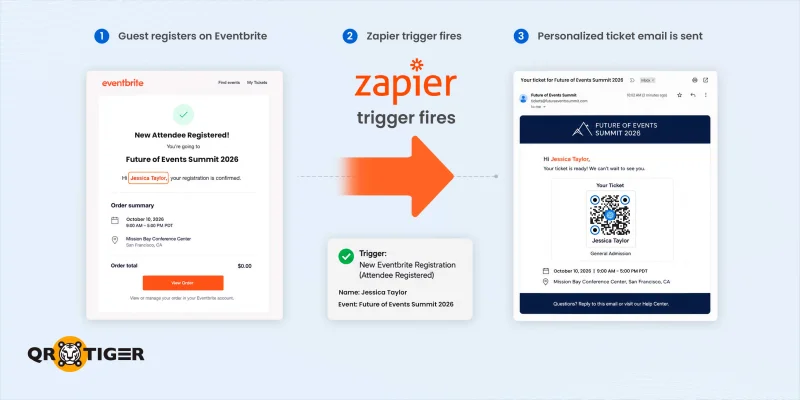
Eventbrite already gives every registered guest a basic QR code, but it only works with Eventbrite’s Organizer app and encodes just the order number.
The pre-event flow upgrades the basic QR ticket with your branding and a custom URL.
Use “New Attendee Registered” as the trigger. It sets off the moment someone buys or reserves a ticket, well before the event starts.
The flow structure:
- Trigger app: Eventbrite
- Trigger event: New Attendee Registered
- Action app: QR TIGER
- Action event: Create Dynamic QR Code (URL)
Step 1: Set up the trigger and connect the event platform
- Log in to your Zapier account, hover over "Create" in the top-left corner, and select "New Zap."
- In the Trigger step, search for Eventbrite. Once it’s set, select "New Attendee Registered" as the trigger event.
- Under the "Account" field, click "Sign in." A pop-up window appears asking for your Eventbrite login.
- Enter your credentials, authorize Zapier, and return to the Zap builder.
- You should see "Setup ✓" checked at the top of the panel and click "Continue."
Step 2: Set up and test the trigger
- On the Configure tab, pick your Eventbrite organization from the "Organization" dropdown.
- Leave "Event Status" set to "Live" (or "Draft" for unpublished events), pick your actual event from the "Event" dropdown, and click "Continue."
- On the Test tab, click "Test trigger" to pull a sample attendee record.
- Confirm the sample includes the fields you'll encode into the QR code (attendee ID, name, ticket type), and click "Continue with selected record."
Step 3: Add QR TIGER and connect your account
- In the Action step, search for "QRTIGER QR Code" and select "Create Dynamic QR Code (URL)" as the action event.
- Under the "Account" field, click "Sign in." A pop-up window appears asking for your API Key and Email.
- To get the API key, open your QR TIGER account in another tab, click "My Account", then go to "Settings".
- Select "Plan," scroll down, and copy your "API Key".
- Go back to the pop-up window, paste your API key, and enter your email. You should see "Setup ✓" checked at the top of the panel, and click "Continue".
Step 4: Build your personalized QR code
- On the Configure tab, click the "URL" field, type “/” or click (+) to open the data picker with fields from your Eventbrite trigger step.
- Build your check-in URL by typing your base URL first, then inserting Eventbrite fields (like ID, Profile First Name, or Ticket Class Name) where you want personalization. Example: yourevent.com/checkin?id={ID}&name={Profile First Name}
- Upload your event logo, set your brand "Color", pick a "Frame" style, and edit the "Frame Text" to your preferred call to action.
- Leave the advanced customization fields at their defaults unless your brand guidelines need more control, and confirm "QR Format" stays set to "PNG".
- Click "Next step."
Step 5: Confirm the test output and publish
- After clicking "Next step" from the Configure tab, the Test tab opens automatically and runs the test. Look for "Test ✓" at the top of the panel to confirm the QR code was created successfully.
- On the "Data out" tab, confirm three key fields: "Image URL" (the direct QR code image link), "QR ID" (the unique code identifier, useful later for event-day filters), and "QR URL" (the short redirect URL guests will scan).
- Copy the QR ID somewhere safe if you plan to build event-day flow afterward.
- If the test failed or the fields look wrong, click "Retest step" to try again, or click "Edit" to return to the Configure tab.
- Click "Publish" to get the Zap live. To deliver the QR code to your guests, chain an email action to Gmail, Mailchimp, or a ticketing platform after the QR TIGER step.
Event-day: How to attach the attendee identity to every scan
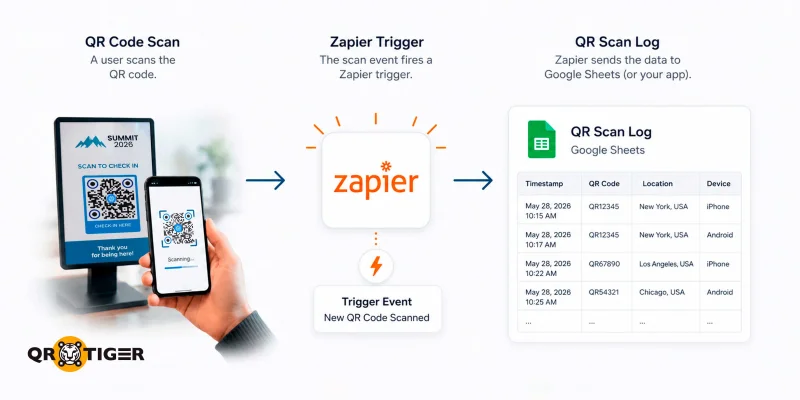
Every new QR scan at the event (in-person or virtual) triggers a Zap that pulls the matching attendee record from your event platform and logs both in your reporting stack.
Event teams use this pattern when their event platform’s native check-in tools don’t capture the reporting depth they want.
The flow structure:
- Trigger app: QR TIGER
- Trigger event: New QR Scan
- Filter step: Match on QR ID (optional, isolates a shared event QR code from other campaigns)
- Enrichment action: Find Attendee by ID
- Downstream action: Any create or send action in your reporting stack (Google Sheets, Slack, HubSpot, or similar)
Step 1: Choose your QR code source
You have two paths, depending on how you want to track scans.
Per-guest tracking: If you have already built the pre-event flow, use the QR codes it generated for each registered guest. Every guest holds a unique code with attendee data embedded into the URL.
Skip the QR ID filter in Step 3 since you want all event scans to flow through, not the scans from a single code.
Shared event tracking: Log in to your QR TIGER account, click "Create QR Code" from your dashboard, and pick a dynamic URL QR code.
Print it on entrance signage or badges. Save the code and note the QR ID from your dashboard, since you'll use it as the filter value in Step 3.
Step 2: Set up QR TIGER trigger
- Log in to your Zapier account and click "Create." Then, select "New Zap."
- In the Trigger step, search for "QRTIGER QR Code," select the app, and choose "New QR Scan" as the trigger event.
- Under “Account,” choose your existing QR TIGER connection from the dropdown menu if you already connected it during the pre-event setup.
- If this is your first Zap using QR TIGER, click Sign in. Then follow the API key steps from Step 3 of the pre-event setup to connect your account.
- Click “Continue.”
Step 3: Test the trigger and filter by QR ID (Optional)
- Click the Test tab, and Zapier automatically pulls up to three of your most recent scans as sample records. If the samples look stale, click "Find new records" and run a fresh scan on your phone to generate new samples.
- Select a sample scan from the left panel and confirm the scan fields on the right (QR ID, Scanned at, Device, Country, City, Region, IP address, Short URL). Click "Continue with selected record.”
- If you used the shared event tracking path in Step 1, click "+" below the trigger step to add a filter step, search for "Filter by Zapier," and select the app.
- Choose QR ID from the trigger step. Then select (Text) Exactly matches. Paste your event's QR ID into the Value field. Click “Continue.”
- If you used the per-guest tracking path in Step 1, skip the filter and move straight to Step 4. Every pre-event-generated QR already belongs to a valid event registration.
Step 4: Enrich with event platform data
- Click "+" below the filter to add an action step, search for Eventbrite, and select "Find Attendee by Id" as the action event.
- Under the "Account" field, select your existing Eventbrite connection from the dropdown if you connected it during the pre-event flow. If this is your first Zap with Eventbrite, click "Sign in" and authorize Zapier to access your account, and click "Continue".
- On the Configure tab, pick your Eventbrite organization, and select your event.
- Click the “Attendee” field and map the Attendee ID from the scan URL. Use the QR TIGER trigger step’s URL field or parsed ID variable, depending on how you structured your check-in URL in the pre-event flow.
- Leave the two default settings ("Successful if no search results are found?" and "If multiple search results are found") as-is for most events. Adjust only if you have edge cases like duplicate registrations.
- Click “Continue” to move to the Test tab.
Step 5: Test the full flow and publish
- On the Test tab of the Find Attendee action, the "Data in" panel shows the search parameters Zapier will send to Eventbrite. Confirm that the attendee ID field contains a valid value pulled from the QR TIGER scan trigger.
- Click "Test step" to run the search against Eventbrite.
- Look for "Test ✓" at the top of the panel to confirm Zapier found the matching attendee record. On the "Data out" tab, scan the enriched fields to confirm you're getting the guest data you need (name, ticket type, email, etc.).
Step 6: Add a downstream action, test the full flow, and publish
- Zapier requires a create or send action after a search action like “Find Attendee by Id”. Click “+” below the Eventbrite action, search for a reporting tool like HubSpot or Google Sheets to log QR scans, and select the relevant action event.
- Connect your account, then map the scan fields and the matched attendee fields to the destination columns or record fields.
- Click “Test step” to confirm that the downstream action receives the data correctly.
- Click "Test run" to test the full flow end-to-end.
- If the “Publish” button remains grayed out, look for any step that shows a yellow warning icon.
- Click "Publish" to turn the Zap on.
- Do a live test three days out with a real scan.

What data can I get from QR code scans?
Event check-in automation online, like QR TIGER and Zapier, records QR scan timestamps to the second and automatically passes them into your reporting log.
Fields you’ll see with every scan:
- Time of scan
- QR ID
- Device type and operating system
- Location at the country and city levels
- Precise GPS coordinates (Premium plan only, with user permission)
Post-event reports get sharper with timestamped scans.
Patterns worth watching:
- Early arrivals versus latecomers by ticket type
- Peak door pressure (helps with staffing next event)
- Session drop-off during breaks at multi-session conferences
- Return scans (when someone stepped out and came back)
Send the same data to a second reporting tool through an additional Zapier action. Teams using Google Analytics for campaign reporting can chain a GA4 event action.
Scan speed gets the press, but the real payoff is a timestamped record of who arrived and when. QR TIGER plus Zapier keeps that data flowing to any tool you use for reporting, CRM, or follow-ups.
What are the post-event actions I can trigger after each scan?
A single Zap can chain multiple actions to a single scan or check-in trigger, turning your event check-in system into a downstream automation engine.
Sample post-event automations:
- Send a thank-you email through Gmail or MailChimp 15 minutes after the event ends
- Add check-in guests to a warm-leads list in HubSpot or Salesforce
- Auto-generate a PDF certificate for workshop attendees
- Post live attendees' stats through QR alerts to Slack or Microsoft Teams channel for your team
- Dop no-shows into a re-engagement sequence for next year’s event
Zapier stacks multiple actions per Zap. One scan does five jobs at once.
Pro tip: For repeat events, save your Zap as a template. Duplicate the template and save the new QR code for the next event.
How much time does QR code automation save event organizers?
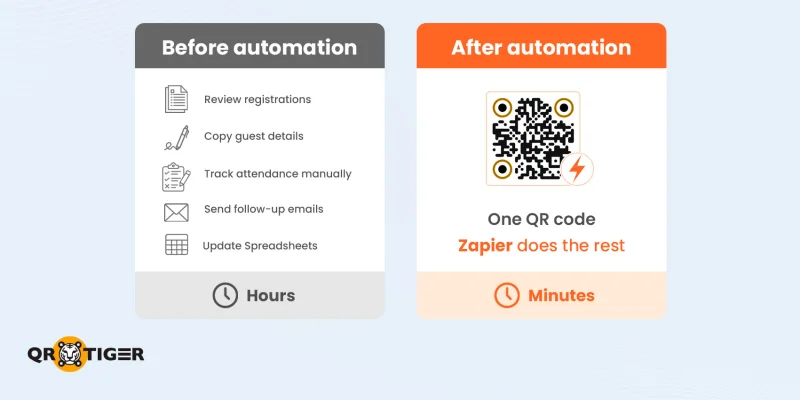
More than half (55%) of consumers scan QR codes to save time, according to QR TIGER's 2026 QR Decoded report.
Event check-in automation removes much of the manual work that keeps event teams busy during and after events.
Take this, for example. A team of two runs a 300-person event. Their pre-automation workflow might look like this:
| Manual Task | Usual Time it Takes | Automate with QR codes + Zapier |
| Enter and print the attendee list | 5 to 15 minutes | Create attendee records automatically after a QR code registration. |
| Staff check IDs and cross out names at the entrance | 2 to 3 hours | Instantly verify attendees and mark them as checked in when their QR code is scanned. |
| Retype attendance into the event platform | 1 to 2 hours after the event | Sync check-in data automatically to your event platform, CRM, or spreadsheet in real time. |
| Manually send ticket and thank-you emails | 30 to 60 minutes | Email digital tickets after a successful QR code registration and automatically send thank-you emails after check-in. |
| Compile stakeholder report | 1 to 2 hours | Automatically log registrations, check-ins, and attendance data in a dashboard or spreadsheet for faster reporting. |
Once your event QR code automation is live, everything else runs on its own during and after the event.
Fewer touchpoints also mean fewer human errors. No lost signatures, no misspelled names, no double entries in the guest list.
Common questions from event teams
How to use QR code for event check-in?
To use a QR code for event check-in, send each attendee a unique QR through email or your ticketing platform. Staff scans the code using an event management app and records attendance in real time.
How to set up a QR code for an event?
To set up a QR code for an event, create a dynamic QR code and assign it a destination URL. Connect your QR TIGER account to your event platform through Zapier, then choose a workflow that fits your check-in process.
How do event QR codes work?
Dynamic event QR codes use a short URL. When someone scans it, the scan sends data such as a timestamp and location to a connected app via a Zapier trigger. Your event platform receives that data and updates the guest's record.
How do I automate event check-ins?
To automate event check-ins, you can use QR codes. Link QR TIGER to your event platform through Zapier. One flow creates ticket QR codes on registration; the other captures scan data for automatic reporting.
Automate your event check-ins with QR TIGER and Zapier
Connecting QR TIGER to your event platform through Zapier turns manual check-ins into an automated workflow. Instead of managing paper lists and clipboards, your team can register attendees, track check-ins, and collect attendance data more efficiently.
Once your automation is in place, you can reuse it for every event. Your reports will show who attended, when they checked in, and how attendance is distributed by ticket type, session, or time window.
That means less time spent on administrative tasks and more time creating a smooth event experience for your attendees.
QR TIGER's Advanced and Premium plans offer Zapier integration, QR code tracking, and scan-level reporting for every event you run.
Create an account today and connect your event check-ins to your event platform via Zapier.
Terms and definitions
Action: What Zapier does after the trigger fires (like generating a QR code).
API key: A unique string that lets Zapier connect to your QR TIGER account. Available in your QR TIGER account settings under Plan.
Data picker: The Zapier interface panel that lets you insert data from previous Zap steps into a current field, opened by typing "/" or clicking the "+" icon in any field.
Downstream action: The final step in a Zap that acts on data from earlier steps (like logging to Google Sheets or sending a Slack notification).
Filter step: A middle step in a Zap that only lets certain data through based on conditions.
QR ID: The unique identifier for each QR code in your QR TIGER account.
Reporting stack: Your combination of tools for tracking, reporting, and follow-up (like Google Sheets, Airtable, HubSpot, or Slack).
Search action: A Zap step that retrieves data from an app without creating or modifying anything (like Find Attendee by Id). Zapier requires at least one create or send action after a search action for the Zap to publish.
Trigger: The action that triggers a Zap, such as a new Eventbrite registration.
Zap: A single automated workflow connecting a trigger to one or more actions.