Create QR Codes for Customer Surveys

Getting feedback from your customers about your products and services is important for the overall growth of your business.
That is why the emergence of the best QR code survey generator has become a total lifesaver.
With that being said, QR codes are just the right marketing tool and solution to get that feedback right away!
If you’ve landed here, I guess you already know what a QR code is.
A QR code that can be easily scanned just by using your smartphone camera feature or QR code reader app, which makes it quickly accessible to people from all age brackets.
Using a free survey maker with QR code feature, you can direct a customer to your online survey form for easier data collection.
Using this, you can measure the overall rating of your customers’ satisfaction results and what improvement you should make to make your service even better the next time.
Want to know how you can conduct a survey with QR code technology? Read this full article to know more.
Generate a QR code for a survey form using a QR code generator

Here are easy-to-follow steps in converting your online survey form into a smartphone-scannable QR code:
Step # 1. Make your online survey form
Assuming that you’re already done with your survey form from your desired platform. You can use a free form generator or Google Forms, for example.
Once ready, copy the sharable URL of your form, and paste it into the QR code generator online.
Step #2. Use a survey QR code generator
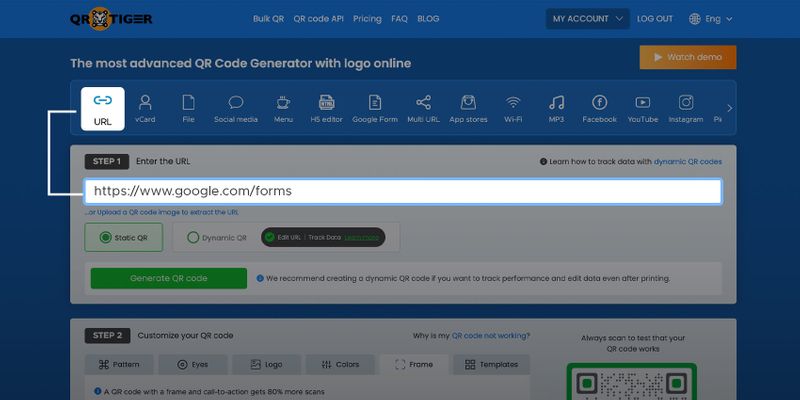
Once you already copied your URL, paste the link in the empty data field. Then, you can choose between a static QR code and a dynamic QR code.
Then click the Generate QR Code button.
For better performance, select Dynamic QR. Here’s why:
- Can edit the stored survey form link anytime
- Track the QR code analytics
- Access to other advanced features: QR password, expiry, scan reports, GPS tracking, geofencing, and retargeting tool.
Step #3. Make your QR code unique
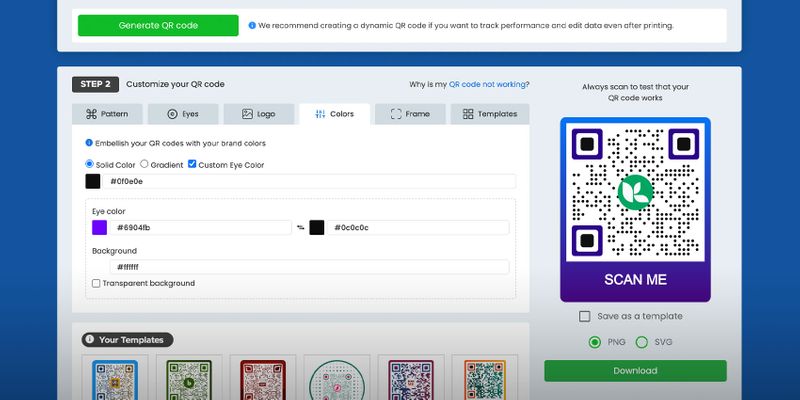
After you click on the Generate QR code, you can now start to customize your QR code. Use our impressive and easy-to-use QR code customization tool to make your survey QR code unique.
By customizing your QR and adding a clear call-to-action, you can boost scans by 80% more!
Step #4. Save your QR code
Once done, you can save your QR code by clicking the Download button. You can download it in two image formats—SVG and PNG.
Step #5. Track your QR
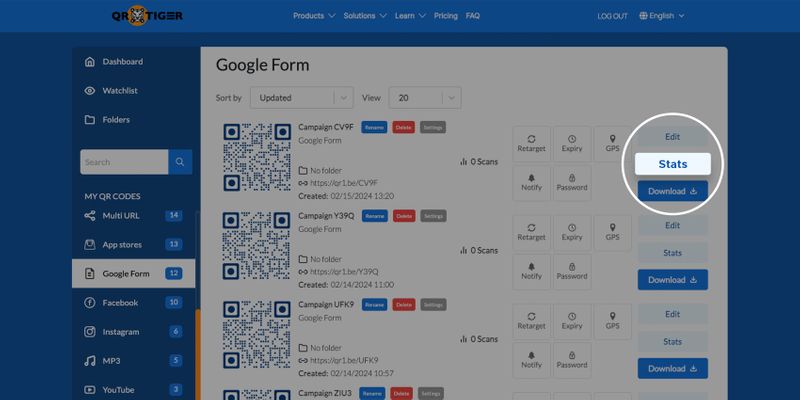
QR code tracking is what sets dynamic QR codes apart from static QR codes.
Easily track your survey QR code in one place—your account Dashboard.
To do so, click the My Account > Dashboard > Select the QR code you want to track > Stats. Here, you can see an overview of how well your QR code is performing.
How to create an online survey form
Step #1
Go and click on Google Forms
Step #2
After you click on Google Forms, it will then land you in a questionnaire format where you can start to create your survey questions.
Here, you can add as many questions as you want.
You can also customize how you want your answers to be, whether in the form of multiple-choice, short answer, or paragraph form. It’s all up to you.
You can add a video, image, or text to your survey questions just by clicking the buttons on the right corner.
Step #3
Assuming that you’re already done making your questions, click the preview button, and there goes your survey form, and you’re done!
You can also track the data response on your Google survey form by clicking the “response” button on the right side of the “questions” button.
Convert survey form to QR code in seconds with QR TIGER QR Code Generator
QR codes for survey forms offer an efficient and cost-saving choice in collecting feedback from customers or respondents in general.
What makes them the ideal alternative is their mobile accessibility. With QR code technology on the scene, everyone with a smartphone can access your online survey form easily.
In just a swift scan and a few taps, they can fill out your form and submit answers hassle-free.
Transform your feedback system with the best QR code generator now!


