Setting up the Menu for Multi-Location Restaurants with MENU TIGER
By: Niña D.Published on: June 10, 2022Update: June 03, 2025
MENU TIGER’s multiple store management feature makes setting up the menu for your multi-location restaurants effortless.
Restaurants typically upload a JPG or PDF view-only digital menu from their offline documents or online documents like Upstore premium and free subscriptions, or Google Drive.
MENU TIGER, on the other hand, allows restaurants to construct an interactive digital restaurant for each location that they can control from a single dashboard.
It lets you make a shared layout on the admin panel and instantly extend them throughout your restaurant locations.
Moreover, it lets you easily maintain the layouts shared among your restaurants.
You will only manage one shared format rather than multiple different layouts for each store location.
Setting up store layout for multi-location restaurants
Set up multiple stores for other restaurant locations in your MENU TIGER admin panel through this guide:
1. Setting up multiple stores
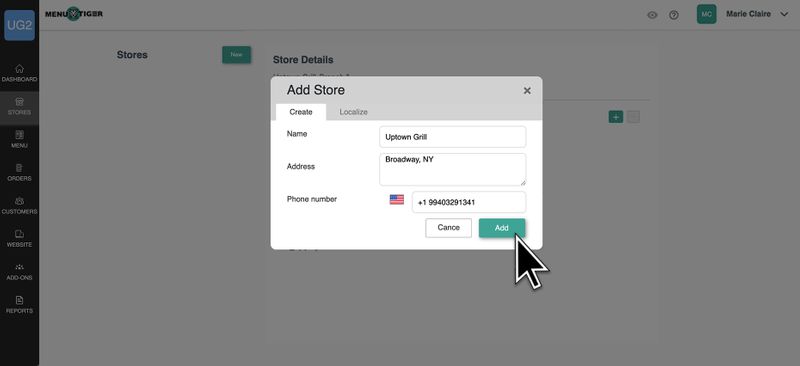
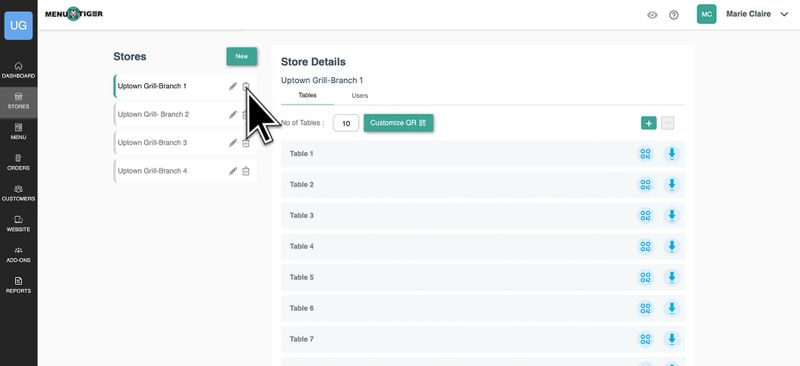
On the MENU TIGER admin panel, go to Stores and choose New.
Fill out your store name, address, and phone number.
Tip: You may include the area name or store location as your store name for easy identification. (i.e., Uptown Grill – Broadway, NY)
Add as many stores depending on your chosen plan.
Regular plan – up to 2 stores
Advanced plan – 3 to 4 stores
Premium plan – 4 to 5 stores
Platinum plan - up to 7 stores
Visit MENU TIGER to know more about the pricing plans and inclusions.
2. Setting up customized menu QR codes for multi-location restaurants
Place your restaurant’s logo.
Upload your restaurant’s logo in PNG or JPEG file to place it at the center of your menu QR code.
Select data and eye patterns.
Then, change and select the shape of your QR code data and eye pattern.You can use squares, circles, diamonds, and other shapes.
Choose pattern, eye, and background colors.
Choose a single color or dual color gradient data pattern according to your brand.Your QR menu data color must be dark enough so QR code scanners can read and recognize them.
Then, choose a color lighter than your pattern for your background.
Set your frame.
You can create and generate a traditional and straightforward menu QR code without a frame.But if you want to improve its appeal and scannability, you can add a frame or CTA phrase like “Scan Menu,” “Scan for Menu,” etc.
View and check the workability of your menu QR code.
Scan your menu QR code to check workability.
If it t should redirect you to your website’s home page and digital menu ordering page if it is working properly.
Sometimes, you just need some helping hands when restaurant operations are hectic. Hence, add users and admins to your stores.Click Users then fill out the needed information in adding admins and users.
Note: The dashboard feature is only available to admins. Only the orders associated with a user’s account are accessible.
Setting up the menu for multi-location restaurants
Here’s how you can set up a digital menu you can use for different restaurant locations:
1. Go to Menu
On the admin panel, click Menu.
2. Make food categories
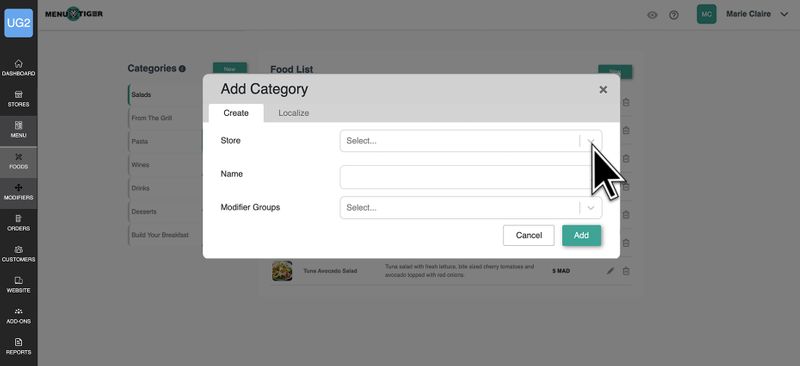
First, select Foods and create food categories such as salads, pasta, desserts, beverages, wines, etc.
Second, beside the Categories label,click New.
Then, select the store/s where the category will appear.Then, long-press and drag on a category to rearrange the order of appearance.
Finally, select a Modifier Group if you have already created modifier groups. If you haven’t yet, here’s how:
3. Create Modifiers
To create modifiers for a food category or a food item, go to Menu then choose Modifiers.Then, create a name for your Modifier Group and set each modifier’s price per unit. Customers use modifiers to upgrade and customize their food item orders.
For instance, you can create modifiers like add-ons, extras, sides, doneness, etc.
4. Add menu food items for multi-location restaurants
You can add individual food items after creating your food category and modifiers. First, choose a food category.Then, on the upper right-hand side of the Food List label, click New and fill out the food item information.
Remember to follow these guidelines when adding a food item:
In the “Store” section, enter the name of the store.
Fill in the food item name.
Give the food item a brief description (maximum 100 characters).
Set the price.
Specify the serving size.
Check the “Featured” box to feature the food item on your website. A green dot above the food item photo means a featured item.
Check the Availability box to indicate that the item is available, otherwise, uncheck the box. A red dot above the food item photo means an unavailable item.
Include any ingredient warnings. Choose from the “Ingredient Warnings” section’s list.
Choose your modifier groups.
Provide the expected preparation time in minutes.
Upload up to three 400×300-pixel photos of your food item.
Note: Localize the language settings for your food categories, food items, modifier groups, and modifiers to accommodate multilingual customers.
Benefits of setting up a multi-location restaurant menu with MENU TIGER
1. Effortless menu configuration
Creating and managing digital menus for different restaurant locations is easier. Thanks to MENU TIGER’s multi-location store management feature.
Usually, restaurants upload a view-only JPG or PDF digital menu from their offline documents or online documents like Upstore premium and free subscription or Google Drive.
Using MENU TIGER, however, enables restaurants to create an interactive digital restaurant for each store that they can manage in one account.
You won’t need to create multiple individual menu layouts for different stores since you can make a unified menu for all store branches.
You’ll only need to set up one e-menu app layout for all multi-location restaurants.
2. Faster menu update
Also, updating your digital menu is a breeze. No need to go over different stores and update each food item individually.
Since it is a unified menu, all updates and configurations will reflect all digital menus in real-time.
3. Easy update of available and featured items
MENU TIGER’s feature and availability checkboxes can simplify updating food items.
Simply check the feature box to feature an item on your restaurant website. You can uncheck if you want to remove it on your features page.
The same goes with updating availability. You can check and uncheck the availability box when an item is available or unavailable easily.
4. Unified digital menu setup for multi-location restaurants
Create a coherent restaurant contactless menu by offering identical food items to all of your restaurant store branches.
5. Consistent restaurant operations
A unified menu for multi-location stores means creating consistent recipes, services, and transactions for your restaurant chain.
6. Strengthen restaurant brand
Consistency and coherence are the foundations of a strong brand. Hence, creating identical menus for multi-location restaurants will strengthen your brand.
Frequently asked questions
1. How to edit your store details
Go to Stores then click the edit icon beside the name of the store you plan to edit. Proceed with your edits and click Save.
2. How to translate your store details
On the admin panel, go to Website then select General settings.
Choose restaurant languages you want to have in your digital menu, and click Save.Then go to Stores and click the edit icon of your chosen store.
Select Localize to translate the website and digital menu to your chosen languages. Click Save.
Make sure you have already set the languages on the General Settings of the Website section.
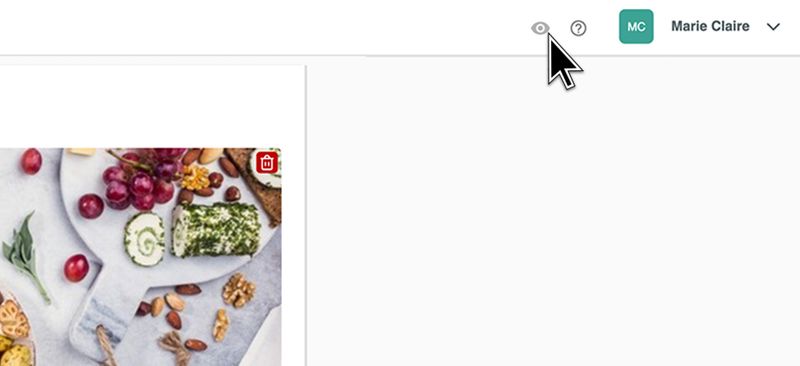
3. How to preview your created stores and menu
To preview, click the preview icon on the upper right-hand part of the admin panel.
4. How to delete your store
Go to Stores.
Click the delete icon beside the store you want to delete.
Then, confirm your deletion and click “Yes, delete”.
Easy setting up of menu for multi-location restaurants with MENU TIGER
Managing multi-location restaurant and restaurant chain menus has never been easier with MENU TIGER.
A single account can manage multiple stores and digital menus for multi-location restaurants.
You can create, configure, and update digital menus for multiple restaurant locations easily and in-real time.
Wondering how you can use MENU TIGER for your business? Sign up today and get 14-day free trial to any subscription plan!